Working With Masks
Preparing your mask to work in PS.
This is another really big difference in Photoshop. Masks do not work at all like in PSP. You will need a little tut in doing these, OR you can use a certain filter.
Mac's Remove White
Quick Mask Mode
I am going to start with the difficult version of this. This has quite a few steps in it.
Open your mask in Photoshop. You will notice that it is a flattened "Background" layer. You need to double click on the layer to promote it to a full layer.
Select > All (from the top menu)
Edit > Copy
Select > Deselect
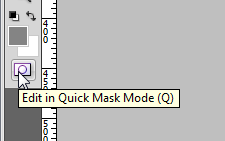
Select > Edit in Quick Mask Mode (or click the quick mask button at the bottom of your tools pallet)

Edit > Paste (you will see that some of your image turns red, this is good)
Select > Edit in Quick Mask Mode (again)
This will give you a selection of the white part of the mask.
Now. Is your mask Black with white shapes, or white with black shapes? This is an important detail.
If your mask is white with black shapes, simply hit delete on your keyboard.
If your mask is black with white shapes, Select > Inverse, THEN hit delete on your keyboard.
Select > Deselect.
This will give you a clean layer to work with.
Then simply move your paper or image onto the canvas.
Right click the paper or image layer in the layers pallet and choose Create Clipping Mask.
Right click the paper again and Merge Down.
And you are done.
Filter Method
Now here is the simple version.
If you have the Mac's Remove White filter, you can speed this process up by 500% lol
Open your mask and promote the layer, just as stated above.
If your mask is a white layer with black shapes, simply use the Mac's Remove White filter to get rid of the white areas.
If your mask is black with white shapes:
Image > Adjustments > Invert
Filter > Mac's Remove White
Image > Adjustments > Invert (again)
Then place your paper or image and create your clipping mask just as stated above.
You can also "Paint" a mask onto your layer.
Choose the layer you want to mask.
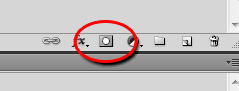
Down at the bottom of your layers pallet, you will see a square icon with a circle in the center of it. This button will add a layer mask.
OR
You can use the Menu method.
Layer > Layer Mask > Reveal All
Click ON the white mask thumbnail and use your eraser tool to erase any portion of the image you wish without erasing the image itself.
If you erase too much, you can use the paintbrush to just paint it right back on.
This is really handy when you need to erase intricate parts of an image without harming the image.