Adding Glitter or Other Animations:

-
-
Tube of choice. I a using the art of Elias Chatzoudis. This tube was purcahsed from MyPSPTubes.com. His art is now available at Creative Design Outlet!
*Do not use his work unless you have a license to do so.*
- Nerves of Steel
|
Open the template supplied in the zip file.
Choose a color from your tube.
Right click on the "mask" layer to bring up the blending options. Click on "Color Overlay" and choose your color.
 Tip Tip 
When you click on the color box, you may click on the canvas to select an exact color.
|
Set the Blending mode to "Color" from the dropdown box. Then just click OK.
Now open your paper1.psd from the supplies.
Now click on the layer in the layer pallet and drag it onto your template canvas. This will add the new layer to your tag. Double click on the layer name and call it "paper1"
Now we want to center it in our tag.
Select > All
Layer > Align > Horizontal Center
Layer > Align > Vertical Center
Select > Deselect
Now we want to move the "paper1" directly above the "circle" layer. Simply click and drag it above that layer in the layers pallet.
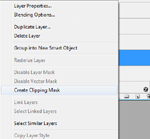
To create a clipping mask, right click your paper layer and choose the "Create clipping mask" option.
That will make something like this on your layers pallet:
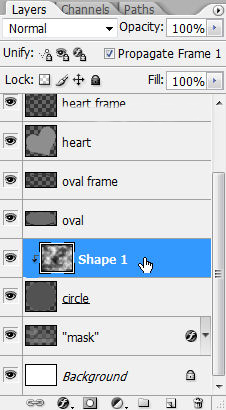
Now your paper only covers the circle on the tag. You may choose to right click > Merge Down now if you like.
Now right click your "circle" layer to open the blending options.
Apply a color overlay using another color in your tube. Set the blending mode to "color".
Note that this colors your paper even though you did not apply the effect directly on the paper. This is because the clipping mask not only takes the shape of the layer below, but it will also take the layer effects.
Now add a stroke of 3 px with the color of white.
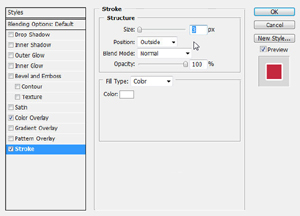
and a drop shadow
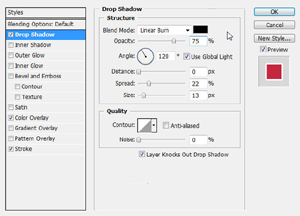
Ok now to the next layer.
Select your "oval" layer.
Open the paper2.psd and drag it onto your tag canvas just as before. Call it "paper2". Center it just as before.
Create the clipping mask on the "paper2" layer just as with the circle. You can merge it down now if you like.
This time choose another color from your tube as the color overlay. Remember to set the blend mode to "color".
Now select your "oval frame" layer. Apply the same stroke and shadow as before. This time choose another color that compliments the inner portion of the oval. Leave the blend mode on normal.
Now select your "heart" layer. This time we need no paper.
Go to Filter > Texture > Texturizer and set the settings like so:
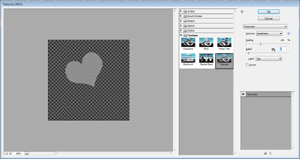
Now right click to bring up the blending options and choose a color overlay. Be sure to set the blend mode. (you may want to experiment with the different blend modes here).
Now select your "heart frame" layer and apply the same settings as the other frame. Choose a color that compliments the inside of the heart.
Ok this may be the time you want to add your tube. Just drag it onto the canvas and it should be directly behind the "bar" layer of the template.
Position your tube and add your choice of drop shadow. I have used Eyecandy 5 Impact: Perspective Shadow for my tube.
Now for your "bar" layer.
Select a color overlay. Blend mode should be normal. That's it... NEXT
Now select your "bar frame" layer and apply the same stroke and shadow as the other frame layers. Select a color for the overlay that compliments the inside of the bar.
Ok, now you have a whole bunch of layers and a whole bunch of effects. Don't be scared of them, they are your friend.
Here is what my image looks like so far:
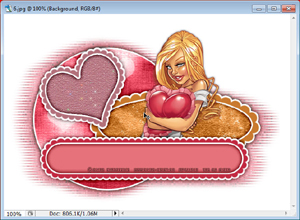
You may choose to add a name at this point. Adding any effects you would like. The same settings as above work really well.
And now for the FUN part.
Open the animation from the supplies. You will notice that it is already in a group.
Back to your tag and select the "heart" layer.
Back to the animation.
Click on the group and drag it onto your tag canvas. This will add the group directly above your heart layer. Now using the move tool position the group over your heart.
Ok now comes the tricky part.
Hold CTRL on your keyboard and click on the thumbnail of the "heart" layer.
You will see your cursor turn into something like this:
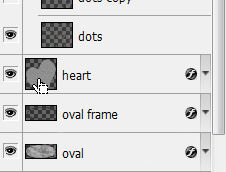
This will select the area of the heart. Now click on your "dots" group (not the layer)
Now at the bottom of your layers pallet, you will see an icon that looks like this:
With your dots group highlighted, and your heart in a selection, click that icon and it should create a mask on your glitter animation so that it only appears in the heart.
If your group does not mask off, simply select the heart again using the CTRL + thumbnail click. Select > Invert.
Click on the mask itself in the layers pallet (it will be a white canvas attached to the layer:
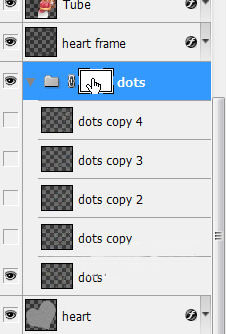
Make sure your background color in your tools pallet is set to black.
Now just hit delete on your keyboard. You should now see the mask in black and the heart in white.
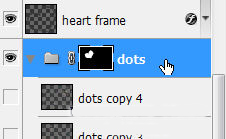
You may choose to hide the background layer at this time.
Ok now that we have the animation where it should be... Now it is time to animate it.
Open your animations window. Window > Animation
You will see that your first frame is already there. Now click on the icon that looks like a piece of paper to duplicate the frame.
See the tutorial on
Preparing your Animation Area for more.
Now for the fun stuff.
Hide your "dots" layer (not the group) and make your "dots copy" layer visible. Just click on the eye in the layer pallet.
Now duplicate your frame again and hide the "dots copy" layer and make the "dots copy 2" layer visible.
Now duplicate your frame again and hide the "dots copy 2" layer and make the "dots copy 3" layer visible.
Now duplicate your frame again and hide the "dots copy 3" layer and make the "dots copy 4" layer visible.
Now duplicate your frame again and hide the "dots copy 4" layer and make the "dots copy 5" layer visible.
You should now have 5 frames in your animation.
But you are not finished!
Now click the first animation frame. Hold shift and click the last animation frame.
At the bottom of each frame, there is a number. This is the frame delay. If it is set to 0, there will be no delay and your animation will be too fast.
To change this, simply click on the arrow beside the number and change it to 0.1 (make sure you still have all frames highlighted)
This will slow your animation down. (you may change it to any number you wish, including decimals)
To view your animation, simply click the play button.
Now to save your animation:
Go to File > Save for Web
Follow the steps in
Saving your Animation.
And you are done! You have finally done an animation using Photoshop.
This technique seems a whole lot more complicated than using Animation Shop, but I do think your results will look tons more appealing.
Here is my result:

I hope you have enjoyed this tutorial! I would love to see your results.